Where Science, Art and Nature Come Together.
winter sewing native seeds
Written by volunteer Jennifer Miller
Starting native plants from seeds can be wonderful, rewarding, and fun… but it can also be intimidating, especially with plants that need special treatments to get their seeds growing. For many of our native plants, it need not be so! Needing to stratify the seed and waiting for months for seeds to germinate in cold storage often has many people turning to their refrigerators. Sometimes this leads to frustrating experiences trying to stratify seeds in sand, moss, paper towels, or other mediums. The truth is, stratifying seed in the fridge can be a fun project and is enjoyable for many people, but if you are like me and don’t have room in the fridge to start dozens of species of plants (not to mention it sounds like a lot of work), there is another way! Stratification is the process of pre-treating seed that simulates natural conditions, and the easiest way to do this is to allow the seeds to actually go through natural conditions outdoors, over winter. Our native plants are perfectly adapted to this, as they have been evolving with and growing in these conditions for tens of thousands of years. A native seed often needs to go through the hardships of winter… freezing and thawing, to help break down its seed coating gradually, and for it “know” when to wake up and germinate. A great thing about doing it naturally is that you also don’t need to harden off your new seedlings when moving them outdoors- they don’t need any help, as they don’t transition from indoors to outdoors.
The simplest and most natural way of winter sewing is to prepare a patch of soil in a location appropriate for the selected species of plant, remove all weeds, and sew your seeds there in late fall or during the winter. The downsides of doing it this way are that seeds are food for many animals, and the wildlife… from mice, to voles, to birds and more… will be very happy to eat your seed! And, eventually, this is the goal, of course. Natural food for our native species! But to get to that point, you need to get some plants started, right? Protecting the newly seeded area with wire mesh can help, but then in spring, it can be confusing to try to identify the seedlings you planted from the non-native weed seedlings that are ubiquitous in many areas. After all, you don’t want to weed your new seedlings. Still, this is an option for seeding large areas for restoration work, and it can work with careful site preparation and aftercare. For smaller home gardens, the way I recommend beginners try winter sewing, though, is in simple containers outdoors. There are many ways to winter sew in containers, and if this interests you, there’s a wealth of information and friendly groups online that are always helping and discussing methods to learn more. I have had excellent success with the following method, which I learned over the years and adapted to my growing conditions here in Western NY. Sewing seed in enclosed containers has allowed me to protect the seeds from being eaten, keeps weeds out during germination, and lets me clearly label each species (so that I know for sure what is coming up!). It is also blissfully easy, because it requires neglecting the containers outdoors all winter!
When can you winter sew native plant seeds? Most plants that require a single stratification (one single winter in this case) will germinate after being exposed to between 30-90 days of cold/winter conditions. In our region, this means that if you can plant them by Valentine’s Day in mid-February, they will have enough time in the cold to do their thing! So, in our region, winter sew seeds any time between November-February.
Winter Sewing Native Plants: Recycled Container Method
Winter sewing in containers is ideal for scavenging some recycled materials! Ideal containers are transparent or translucent (allows some light in). You need a container that can have holes poked for both drainage and ventilation; on the bottom and on the top, and one that is deep enough to fill with several inches of soil, with enough head room above for seedlings to get started growing.
Container ideas: Select transparent or translucent containers that allow some light through. Such as: plastic milk jugs, 2 liter soda bottles, clear plastic salad “tubs”, large plastic juice bottles, large rigid plastic snack containers, large plastic to-go containers (e.g. large rotisserie chicken containers), etc.
My favorite are plastic gallon milk jugs, because they are easy to cut and easy for me to get. Use whatever you can get!
Container preparation: Wash the container of any food residue. Make sure the bottom of your container has ample drainage. You can poke holes with a sharp tool, or use a small drill bit. Use care! The top of your container will need some ventilation; you can cut a few short slits with a sharp tool such as a utility knife or box cutter. This will allow the air to vent like a mini-greenhouse, and will allow rain and snow melt in, to keep the soil from drying out. If your container has a screw-on lid, I suggest leaving it in place for now.
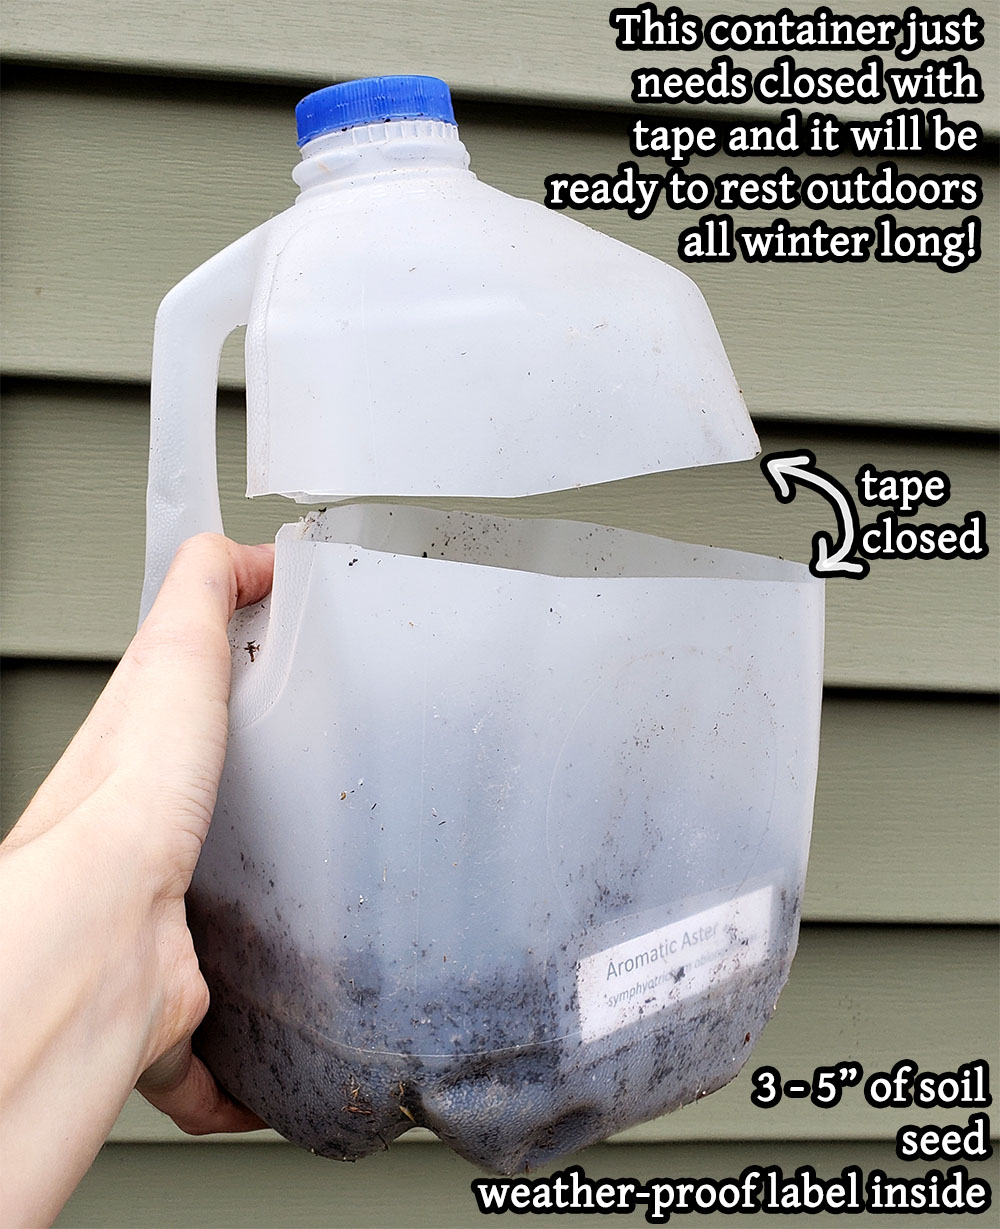
Next you will need to be able to get your soil and seeds in there! If using a large salad “tub” type container, this is as easy as taking the lid off. For things like milk jugs and bottles, you will need to cut the jug nearly in half. Use scissors or a utility knife, and be careful so that you do not cut yourself! If you are doing this with children, make sure an adult does this part. You will want to cut the container nearly in half, several inches from the top, so that you have room to plant 3-4 inches of soil in the container easily. I like to leave the plastic “hinged” on one side to make it easier (the handle on milk jug works great for this), but it’s not necessary. Careful, the cut plastic edges can be sharp.
Planting your seed: Using any well-draining bagged potting-type soil, moisten the soil. Scoop 3-4 inches of soil into your container and gently settle it into place. Sprinkle your seed onto the soil. You can then work them lightly into the surface into the soil with your fingers, or some chopsticks, or an old fork. Most small seeds don’t like to be buried much if at all. Generally, do not plant the seed any deeper than it is wide/tall. For most seeds, this is less than 1/8th of an inch! If the species you are planting needs to be planted more deeply, sprinkle some extra soil on top. How much seed should you use? This depends on the size of your container and the species you are growing. Remember that usually not every seed will germinate, and that you will be separating them out after they sprout. Imagine your seed like sprinkles on a brownie. If the seeds are large, you only need some (for example milkweed). If they are smaller, you can add more. After you plant your seed, it’s a good idea to give the container a gentle watering.
Label it: Don’t forget this step, or you will be cursing your past self, come spring! Label your seeds now. I highly recommend putting a label inside of your container. It is tempting to label the container on the outside with a marker, but outdoor conditions will fade it away by spring. I speak from experience! My favorite way to label is to use water-proof ink and write the species name on a tag of paper. Or print the tag with any printer that uses toner. Then I either laminate the tag with my craft laminator, or use packing tape to “laminate” the paper between a tape sandwich to waterproof it. I tuck this inside the container, it stays there, and is easy to read in spring.
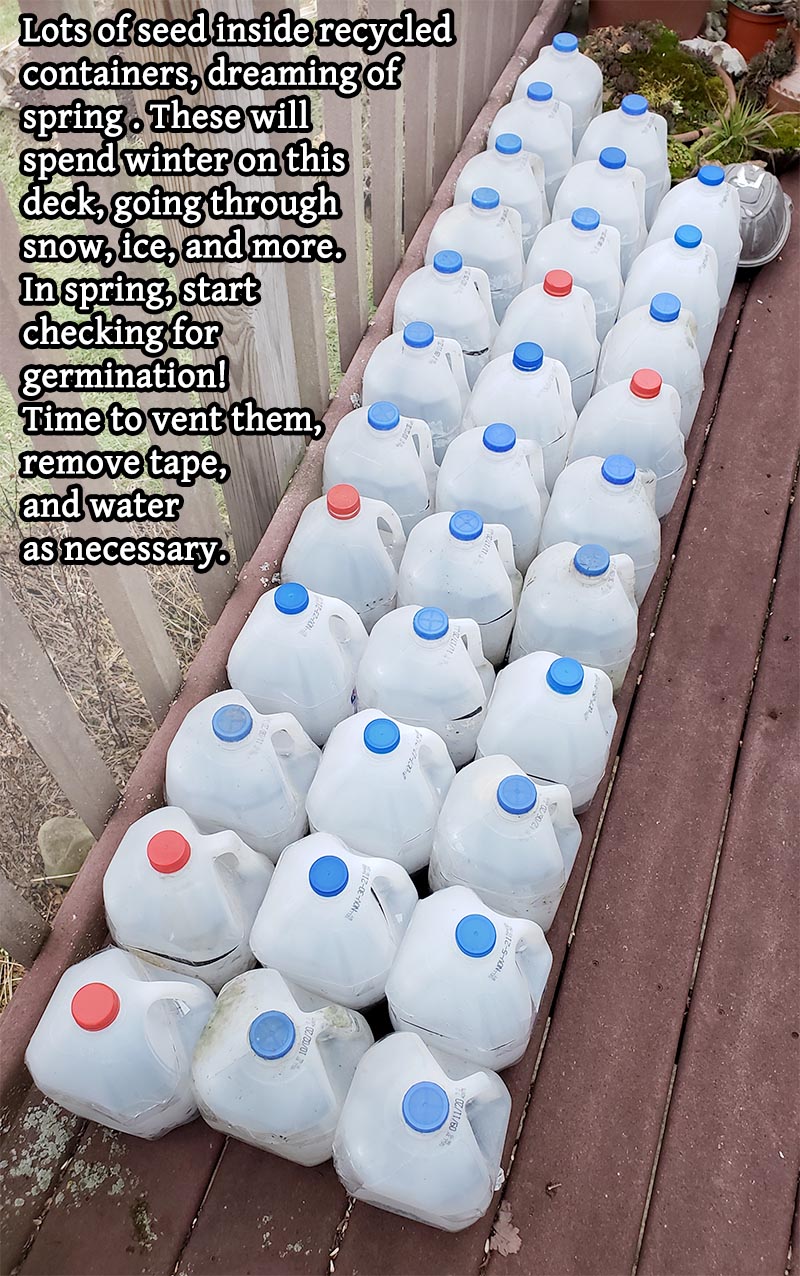
Closed for the winter: After planting your seed, you will need to re-enclose your container. This may be as simple as replacing the lid, but if you had to cut a container such as a milk jug in half, you can use simple packing tape to seal it back up. I have seen people use zip-ties with a hole punch to create straps, but the tape method works great for me. Now set the containers outdoors. It really is that simple. The best locations are where they will be exposed to the elements; don’t place them in an area that is sheltered by a home overhang, for example. You want your container to get some sun and snow and rain. And then ignore it! The only exception is if we get a long stretch of unexpectedly warm days above freezing, in winter. You might need to check to make sure the soil doesn’t dry out if this happens.
Take a peek in spring: As early April arrives, spring plants start to wake up, little by little. You can start checking your winter sewing containers for signs of life. Taking the milk cap off to peek inside is always fun! Many plant species will start to germinate in April and May, but some species are very sleepy and might not wake up until nearly June (milkweeds, for example). Do not give up; the seeds know when to grow, and they will not all start at the same time! Patience is key! I never give up on a container until summer has passed, and even then, sometimes I get surprises. As the weather warms, peek into your containers more often. Once you see the seeds just starting to germinate and poke their cotyledon out (the first “leaves”), it’s time to remove the cap on your container, if it has one. If there is no screw-off cap, you can cut somewhat larger slits in the top of your container with a utility knife, for better ventilation. As the days warm, you don’t want to cook your new plants! Once the seeds germinate, water as necessary to keep the soil from drying out. You can test the soil with a finger, or a chopstick. If a fine coating of moss has started growing in there over the winter, don’t be alarmed! It won’t hurt the plants.
Germination: Once your plants have germinated and grown their true leaves, it’s time to let them breathe. Take the tape off of the container and open it up, or take the lid off entirely. Now is the time when they need good airflow! This is also when you will probably need to start watering somewhat regularly, depending on weather conditions. Don’t let your new plants dry out. This is a great time to prepare the garden site where you want to transplant the young plants to, because that time is coming soon!
Transplanting: After your seedlings have at least one or two sets of true leaves, you can transplant them. I like to use an old spoon to scoop each plant out, and some chopsticks for working them out if necessary. You can transplant them directly into your garden, or if you have as much hungry wildlife as I do, you can transplant them into starter pots until they are a bit bigger and more robust and able to take a little abuse from slugs and other nibbling creatures. If your seedlings came up in a thick mat—especially species that make very fine mat of tiny seedlings like lobelias do, you can use the “brownie” method. Gently cut the soil into small “brownies” with a butter knife or something similar, and plant each “brownie” into a pot. As the plants grow, you can thin them if desired, or leave them as a clump (this does happen in nature too), however you desire.
After care: Young plants can be delicate and may need extra care, including supplemental watering as necessary, depending on the needs of the species, the location, and the weather. After the first year of establishment, if sited properly, most native plants will not need supplemental watering. Knowing what conditions the plant species likes is important to planting it in the correct place. It is easy to look up online as long as you know the species name. I suggest searching for the scientific name to get the most accurate information.
The years to come: Many native plants are slow to grow and establish. If starting from seeds, expect your plants to spend much of their first year in the ground growing a large root system. One of the wonderful aspects of native plants, especially prairie/meadow plants, is their large root systems, which help take up water, and also store atmospheric carbon in the soil. Growing these roots is a lot of work, so your plants might not look like much in the first year. Some species go faster than others, but as a general rule of thumb, the saying is: “The first year they sleep, the second year they creep, and the third year they leap!” meaning that patience pays off, and if you are planting a flowering species, it pays off in blooms! Don’t be alarmed if your plants are starting slow and don’t look like much at first.
Where do you get seeds for winter sewing?
Beware seed mixes and “wildflower” mixes commonly sold at stores. Unfortunately, most of these mixes contain invasive plants and flowers from Europe and Asia. While pollinators might visit the flowers, and lovely to look at, the plants from these mixes did not evolve here and most of our wildlife cannot properly use them. Some of our destructive invasive species started in the gardens of well-meaning gardeners. Please stick to plants that are native to your region! This can require a bit of research, but this is easier than ever with the internet at our fingertips. There are many tools online to help you find species native to your area. Searching for “native plants for my region” online will result in several online tools that let you search by ZIP code. Once you know what species you might like to grow, you will need to find some seed! While it is best to get seed with genetics adapted to your area (local seed) this can be very hard to do in some areas where there are limited nurseries that specialize in native plants. Mail order is an option with many online nurseries, but make sure you are selecting species native to your region, especially if the seller is located out of your state. Some native plant nurseries have range maps listed on their website which can be a great way to double check. You can also collect wild seed, but I recommend you do this only if you can be certain of your identification skills and have landowner permission. Collecting from the wild must be done ethically, especially with native plants that are no longer in abundance. You also don’t want to accidentally collect invasive species and invite them into your yard. Please research and be thoughtful if attempting to collect seed. I hope to lead a program on how to do this for Pfeiffer in the future, stay tuned!
This method works well, but nature never fits into a neat and perfect box.
Even with winter sewing, a few plant species are difficult to germinate. Most of our wonderful native flowering plants grow easily from winter sewing, but there are a few outliers. Knowing what kind of germination your plant needs will be key to success. Before the internet, a lot of trial and error was needed, but now we have entire plant catalogues with germination codes at our fingertips! This is not an endorsement, but an easy way that I have found is to use the www.prairiemoon.com website to look up germination codes. Though they are based in Minnesota, they carry many species native to our region as well, and one can easily plug the plant name into the search bar and find out what germination it needs. There is a guide to germination codes on this page: https://www.prairiemoon.com/blog/how-to-germinate-native-seeds
Some shrubs, trees, flowers, and others, have evolved to germinate in different conditions. Some berry seeds normally pass through a bird’s digestive system before they germinate, for example. Some seeds need a fungal partner to get going. Some plants have developed a staggered germination strategy and may need to go through two winter cycles before growing. Don’t distress—most plants do just fine with a single winter of stratification, but knowing what each plant that you want to start requires will help you avoid disappointment.
Are you interested in native plants as a topic? Please let us know if it interests you to learn more, so that we can continue to develop programs on this in the future! Email us!
Want to try some winter sewing but need a few seeds to test the waters? We will have a very limited number of locally donated Wild Bergamot (pink bee balm, monarda fistulosa) seed packets available at the Portville Free Library, while supplies last.
See Also: Native Plant Garden at Lilibridge!